Saturday, June 30, 2012

And the winner of the Walmart gift card is...

kellyr78!

Congratulations Kelly! We had 35 entries and I used Random.org to choose a winner and it randomly chose #3, which was Kelly. Kelly, make sure to check your email so I can get this gift card out to you ASAP. Thanks to everyone who entered! I love doing giveaways. I actually have another one I'm hoping to get up next week. That one involves some free treats! Yum!! Hope you all have a great weekend. Look for another new recipe later today! 

Wednesday, June 27, 2012

4th of July Walmart Gift Card GIVEAWAY!!

****************This Giveaway has ended.*********************


Have you heard about the new steaks at Walmart? They are calling it the "steak-over." Walmart now offers top quality USDA Choice steaks at a great price.  If you're not completely satisfied with your beef, Walmart is offering a 100% money back guarantee. All you have to do is bring back your receipt, and they will offer you a full refund. But, they wouldn't offer that if they didn't think you'd be satisfied right? Walmart sent me two gift cards to try these steaks out for a 4th of July cookout. One for me, and one for one of you guys! 

So who doesn't want free money to spend at Walmart? We are going to run this giveaway fast because I want you to be able to use the gift card for your 4th of July cookout! So do you think you could create a 4th of July barbecue on a $25 budget at Walmart? Tell me what you'd buy with your gift card for your 4th of July barbecue in the comments and you're entered to win a $25 gift card to Walmart! This giveaway will run until Friday, June 29th at Midnight eastern standard time

So if you want to enter to win, comment below telling me what you'd buy and leave me your email address so I can contact you. I will use Random.org and announce a winner Saturday morning. I will be posting a blog post this weekend showcasing what I chose to buy with my gift card from Walmart, including their USDA Choice steaks! Good luck!

Disclaimer: I was given a $25 gift card to use for myself and one to give away. 

Tuesday, June 26, 2012

SunRidge Farms Product Review


A few weeks ago I was contacted by SunRidge Farms to review some of their "better for you" sweet treats. Of course I said yes, I mean who says no to candy? I was so excited to receive my package in the mail. I think one of the best things about having a food blog is all the yummy things I get to try out! OK, back to my review.

Have you ever heard of SunRidge Farms? I honestly hadn't, but I am now glad that I have. Sunridge Farms has been around since 1977 and is a family and staff run business.Their mission is to provide the healthiest products to their customers by producing foods without highly processed or refined ingredients. Sunridge Farms is also committed to being "green." The most impressive thing that they are doing for our environment in my opinion is using solar energy to make their product. How cool is that? You can read more about their green commitment here.


Now to tell you about the samples I was sent to try out. Oh. My. Word. They were so good! My family has really enjoyed these sweets! Sunridge Farms sent me four samples. Here is how the company describes them:

· All Natural Dark Chocolate Coconut Chews - High-fiber, chewy coconut is covered in decadent, antioxidant-rich dark chocolate to create a mouthwatering bite-sized snack. In addition, Vanilla Coconut Chews and Mango Coconut Chews are also available.

 · All Natural Lemon Almonds - Dry roasted almonds are drenched in a tangy all natural lemon yogurt. A delectable snack that is both crunchy and sweet with a twist of lemon.

 · All Natural Mango Almonds - Dry roasted almonds immersed in a creamy mango all natural yogurt create this tantalizing taste of the tropics – a satisfying snack to nosh on this summer!

 · Vanilla Chai Raisins with Green Tea - All natural exotic chai spices and green tea are combined in a creamy vanilla yogurt and then smothered over plump, sun-ripened raisins. In addition, SunRidge also offers Vanilla Chai Almonds with Green Tea.

My family loved them all, but our favorites were the lemon and mango almonds. The flavors were interesting and delicious. It is so great knowing that Sunridge Farms only uses "the finest, healthiest and freshest ingredients, [the snacks] are naturally flavored and colored, Non-GMO, and contain no preservatives, hydrogenated oils, or Trans fats." I mean how awesome is that! I hope you'll check out Sunridge Farms website or look for them at your local organic or natural food grocer. I was definitely  missing out not knowing about this company!

Disclaimer: I received free samples to complete this review. All opinions are mine and I was not compensated for this review. 

Blueberry Bread with Lemon Glaze {sweet treat tuesday}

My husband has declared this the best thing I have ever made, ever. I mean, those are some pretty strong words. I made this recipe twice last week, in a full size loaf and in mini loaves. Both are good, but I think I prefer the mini ones. The bread is so unbelievably moist and that is my husband's favorite part. I think I'm going to make some more this week, and try out some whole wheat flour next time. If you follow me on facebook, you know that I recently bought TONS of blueberries. I mean tons! I also will be sharing a new blueberry banana pancake recipe and a blueberry syrup recipe soon. Who knows, I may try something else new this week, or I may make a ton of my favorite blueberry muffin recipe and freeze them. They are delish! But today, I'm sharing the bread recipe, oh the delicious, blueberry bread with lemon glaze recipe. I love just about anything with a lemon glaze! Oh. So. Good!


Blueberry Bread with Lemon Glaze
slightly adapted from Sweet Tooth


Ingredients:
For the bread: 
1 1/2 cups flour
2 teaspoons baking powder
1/2 teaspoon salt
1 cup plain yogurt
1 cup sugar
3 large eggs
zest from 1 large lemon (reserve juice for lemon glaze)
1/2 teaspoon vanilla extract
1/2 cup oil
1 1/2 cups blueberries, fresh or frozen

For the lemon glaze: 
1 cup powdered sugar
3-4 tbsp fresh lemon juice

Directions:
Preheat the oven to 350 degrees. Grease the bottom and sides of a 9x5" loaf pan or 4 mini loaf pans, dust with flour, and shake out excess. You could also use cooking spray with flour in it.

In a medium bowl, whisk together flour, baking powder, and salt. In a large bowl or kitchen aid mixer bowl, combine together the yogurt, sugar, eggs, lemon zest, vanilla, and oil. Slowly add the dry ingredients to the wet. Gently fold blueberries into the mixed batter.

Pour the batter into the pan and bake 50-55 minutes, or until toothpick comes out clean. Let bread cool in the pan for 10 minutes, and then transfer to a wire rack to cool completely.

To make the lemon glaze, whisk together the powdered sugar and lemon juice and pour over the top of the loaf. Let the lemon glaze harden before serving.

Monday, June 25, 2012

Teriyaki Chicken Lettuce Wraps

These were delicious! I feel like I say that all the time. But really, I wouldn't post it if I didn't think it was good now would I? I loved changing things up and doing lettuce wraps for dinner. I absolutely love the lettuce wraps at PF Chang's, I mean I really don't think there are many other things in this wold that are better. I even eat them knowing they have mushrooms in them and I don't even like to look at mushrooms. OK, back to this recipe, it is mushroom free, but I bet you could add some if you really wanted to! I chose to add some water chestnuts, because I think they are so good. I love the crunch they add to certain dishes, especially lettuce wraps. If you don't like them, omit them, add some nuts. That's what is great about lettuce wraps, you can put anything in some lettuce! Enjoy!


Teriyaki Chicken Lettuce Wraps
adapted from Sunflower Supper Club


Ingredients:
For the glaze: 
1/2 cup soy sauce
1/4 cup brown sugar
1/4 cup honey
1/2 cup red wine vinegar
1/2 teaspoon garlic powder
1/4 teaspoon onion powder
1/4 teaspoon ginger
2 1/2 tablespoons cornstarch

For the filling: 
1 pound boneless skinless chicken breast, cut into small bite sized pieces
1/2 teaspoon pepper
2 tablespoons Sesame Oil
1/2 cup onion, diced
1 tablespoon garlic, minced
1/2 teaspoon dried crushed red pepper flakes (more or less depending on preference)
1/2 lime, juiced (1 1/2 tablespoons)
4 green onions, sliced
8 ounce can water chestnuts, diced
8 lettuce leaves
Fresh Cilantro for garnish, optional

Directions:
In a medium saucepan, mix all the glaze ingredients together, except the cornstarch, and bring to a slow boil. Take 1/3 cup of sauce and put in a small bowl. Mix with the cornstarch and whisk together. Add back into the sauce and simmer until it thickens to desired consistency, about 5 minutes. If it gets too thick, you can thin with a little water. Set aside. 

Season the diced chicken with pepper. Heat a large non-stick skillet over medium high heat and add the Sesame oil. Saute the onion and garlic for a few minutes until onions begin to soften. Add the chicken and continue cooking until chicken is cooked through, about 5-7 minutes. Stir in the red pepper flakes, if using, cook another minute. Pour the Teriyaki sauce into the skillet with the chicken. Add the lime juice, green onions, and water chestnuts. Spoon about 1/2 cup of the mixture into a lettuce leaf and top with fresh cilantro.

I served mine over quinoa.

Sunday, June 24, 2012

Print Friendly Recipes!

So I finally figured out how to get a print button on my blog posts! Thanks to the guys over at Print Friendly for emailing me and letting know about their FREE product! Now all of you who have asked me to get one, will be happy! The button is below each of my posts and all you have to do is click on "print friendly" and it will open a new window for you to print it. You can even delete portions you'd like to omit from printing, like pictures. Anyway, enjoy the new feature!

Friday, June 22, 2012

Easy Ribs {slow cooker}

This was my first ever attempt at making ribs. They were so good! They may looked burned from the picture, but they aren't. I had always been intrigued by making them in the slow cooker, and finally I tried it out. There is an additional step of broiling them, but it really didn't take that long. My husband loved these and I am no longer intimidated by making ribs. You could use this recipe for pork or beef, I chose to use beef. I also forgot to add the barbecue sauce in the beginning, I added it about 4 hours later, and they still turned out great. Enjoy!


Easy Ribs {slow cooker}
slightly adapted from Mmm is for Mommy


Ingredients:
1 1/2 Tablespoons paprika
1 tbsp light brown sugar, lightly packed
1/8 tsp cayenne pepper
1 teaspoon salt
1 teaspoon pepper
2 lbs ribs (I used beef short ribs, but you can use pork.)
1 cup barbecue sauce (homemade or store bought. I used Sweet Baby Rays.)

Directions:
In a small bowl, combine paprika, brown sugar, cayenne, salt, and pepper. Rub this mixture over both sides of your ribs well. Arrange ribs in the slow cooker by standing them up against the wall of the stoneware pot, thicker side down and meaty side against the pot. Pour barbecue sauce over the ribs, cover and cook for 6-8 hours on low (I actually forgot to put the barbecue sauce on and cooked them for about 4 hours before adding it, they were fine.). 

Once the initial slow cooking is done, prepare a baking sheet with foil and place a rack (like a cooling rack) on top of it. Very carefully remove the ribs to the prepared baking pan, bone side up. Set aside. Skim any fat that has risen to the top and strain all of the remaining juices from the slow cooker through a mesh strainer into a small saucepan. Bring to boil and allow to simmer and reduce by about a third, about 15 minutes. 

Preheat your oven's broiler and make sure the oven rack about 10 inches below the broiler element. When the broiler is preheated, brush the ribs with sauce and broil for 3 or 4 minutes.  Remove ribs and carefully flip them over, brush with sauce and broil again, meat side up, for approximately 9 minutes, taking them out once or twice to baste with more sauce. 

Tuesday, June 19, 2012

Lemon Bundt Cake {Sweet Treat Tuesday}

Oh this cake was just perfect. It wasn't too sweet and it was light and fluffy. I made it to go with dinners I was taking to new moms. Definitely a must make. I'm thinking about how it may taste with blueberries in it...because I have a whole lot of blueberries to use! Enjoy!


Lemon Bundt Cake
adapted from A Dash of Megnut


Ingredients:
2 eggs
1 cup sugar
1/2 cup oil
1 tbsp vanilla
2 lemons, zest and juice
1 cup plain yogurt
2 cups flour
2 tsp baking powder
1 tsp baking soda

Directions: 
Preheat oven to 375F. Zest lemons into a bowl and set aside. In a large bowl (I used my kitchen aid mixer.), whisk eggs and stir in sugar. Add lemon zest, oil, and vanilla and mix until combined. Add in lemon juice. Next add flour, baking powder, and baking soda to mixture and combine. Lastly, add in the yogurt. Spray the inside of a non-stick bundt pan with cooking spray and pour the batter into the pan. Bake for 15 minutes, turn pan 180 degrees and bake for an additional 10-15 minutes until toothpick inserted comes out clean. Let cool in the pan for 3-4 minutes and then invert on a wire rack to continue cooling. Sprinkle with powder sugar when cool and serve.

Thursday, June 14, 2012

Sweet Potato Chips/Slices

I don't really care for sweet potatoes. I much prefer red potatoes if I'm going to eat potatoes. And yes, I know that they are so good for you. And I even feed them to my babies when I'm making their baby food, but I've never really enjoyed them for myself. Last week, I found myself with two sweet potatoes that needed to be cooked. I wanted to try something new, so I made these chips or slices more in my case. I dipped them in blue cheese dressing while they were still warm and I finally figured out how I could actually enjoy eating sweet potatoes. They were so good!


Sweet Potato Chips/Slices
adapted from Skinny Ms

Ingredients:
1 medium sweet potato
1 tablespoon olive oil
Salt to taste

Directions:
Preheat oven to 275 degrees. 

Scrub the potatoes, remove blemishes and pat dry. Using a mandolin or knife, slice into very thin, round pieces depending on the thickness preferred. In a large mixing bowl, add sliced potatoes and oil, toss to coat. Spray cookie sheet with non-stick spray, place potato slices next to each other until the cookie sheet is filled. Sprinkle with salt. More than one cookie sheet may be needed. Make sure to rotate them half way through if you are using more than one. If using only one cookie sheet bake on the middle rack. 

Bake for 40 minutes, turn potatoes over and bake an additional 40 minutes. If the edges are crispy remove from oven, if not, bake an additional 2-3 minutes or until lightly browned and crispy around the edges. The potatoes will shrink quite a bit. 

Allow potatoes to cool at room temperature. Chips will continue to get crispier as they cool. Store in an airtight container for up to 3 days.

Note: I don't think I baked mine long enough, they weren't "crispy," but I loved them. I dipped them in blue cheese dressing while they were warm and it was heavenly. You have got to try it!

Tuesday, June 12, 2012

Peach Gallettes {Sweet Treat Tuesday}

Oh, were these good! We had these at our cooking club last week. Our theme was local, so Gretchen used local peaches. This was such a treat! They aren't too hard to make either, such a perfect treat for summer. You could use any fruit you wanted actually, oh the possibilities!


Peach Galettes
from Gretchen slightly adapted from The Baker's Daughter

Ingredients:
Dough
1 cup cold butter, cubed
 2 1/2 cups all-purpose flour
 1/2 cold water
 pinch of salt

 Filling
 6 ripe peaches, sliced
 1 cup white sugar

Extras
 1 egg
 3 tbsp milk
 1/4 cup powdered sugar

Directions:
To make the dough combine the flour, salt, and butter in a food processor. Pulse until crumbly. You can use a pastry cutter or two knives if you don't have a food processor. Gradually pour the cold water in while pulsing until a dough ball forms. Wrap in plastic wrap and refrigerate for one hour.

To make the filling, thinly slice the peaches.  In a medium bow, toss peaches with the sugar and set aside.

Preheat your oven to 350 degrees F. Line 2 baking trays with parchment paper. Prepare egg wash by mixing 1 egg and 3 tablespoons of milk. Set aside.

Cut the dough into quarters and dust your surface with flour. Roll one piece at a time into 12 inch rounds that are approximately an eigth of an inch thick. Scoop a quarter of the filling into the middle of the dough and roughly fold up the sides of the dough, leaving some of the filling exposed. (Reserve leftover juice and sugar for drizzling.) Place on a baking sheet lined with parchment paper and brush with egg wash. Repeat with the other 3 dough balls. Bake for approximately 1 hour, until the filling is bubbling and the crust is golden brown. 

To make drizzle, put leftover juice and sugar from peaches in a small saucepan. Bring to a boil and reduce heat until mixture becomes thicker. Once the galettes are cool sprinkle them with powdered sugar and drizzle with peach sauce. You can also top with ice cream and lemon zest like we did! Delish!

Monday, June 11, 2012

Lamb Meatball Pizza {cooking club}

Have you ever had lamb? I actually hadn't until our first cooking club meeting this spring when my friend brought some to try. Fast forward a month and I was contacted by Superior Farms to participate in their Supper Club contest. I love free food and I really wanted to try some new recipes, so of course I said yes. Last week, a box arrived on my doorstep with three different cuts of lamb for me to sample. It was perfect timing because that night I had cooking club! Superior Farms sent me ground lamb, rack of lamb, and leg of lamb. I decided to make a lamb meatball pizza for cooking club. I shared the new pizza dough that I used last night on the blog. Today, I'm going to share the meatball recipe (which is very tasty all on it's own) and the pizza recipe. We had such a fun time at cooking club and everyone raved over the pizza, so I consider the recipe a success! 


Lamb Meatball Pizza
inspired from crumbly cookie


Ingredients:
for the meatballs:
1 pound ground lamb
1 egg
1 tablespoon dijon mustard
1 teaspoon dried parsley
2 tablespoons minced garlic
1/4 teaspoon thyme
2 teaspoons kosher salt

for the pizza:
1 prepared dough (this recipe makes three, use one)
pizza sauce
1 medium onion
1 tablespoon olive oil
2-3 cups mozzarella cheese, shredded
1/4 cup Parmesan cheese, shredded
a bunch of spinach leaves, maybe 15
1/4 -1/2 cup feta cheese
1/4 teaspoon basil
1/4 teaspoon dried parsley
red pepper to taste
salt and pepper to taste

Directions:
Preheat oven to 400 degrees F. Prepare the meatballs. In a large bowl, combine all ingredients for meatballs. Mix together with hands until all ingredients are incorporated. Form meat into meatballs about 1/2 inch in diameter. Prepare baking sheet with either nonstick spray or place cooling rack on top of baking sheet so that the grease will drop off below the meatballs. I used the cooling rack. Place in preheated oven for 5 minutes, flip over and bake for another 5 minutes. Remove to a plate lined with paper towel to drain excess grease.

While meatballs are baking, start to cook the onions. Heat olive oil in skillet. Slice onion into thin slices and add to hot oil. Stir constantly for about a minute and then reduce heat. Continue to cook over medium-low heat for 10-15 minutes until onions are cooked and golden. 

To make pizza, increase oven temperature to 450 degrees F. If using pizza stone, put in oven to heat up. To get pizza ready, roll out dough on cookie sheet, in any shape you desire. Top with desired amount of pizza sauce. Then top with about a cup of mozzarella cheese, next the onions, some more cheese, spinach leaves, the feta cheese, the remaining mozzarella cheese and Parmesan cheese and lastly the basil, parsley, red pepper, salt, and pepper. 

Transfer pizza to hot stone or place cookie sheet into oven. Bake for about 8-12 minutes, until cheese is bubbly and crust is golden brown. Remove from oven, let cook for 3-5 minutes and serve hot!


Sunday, June 10, 2012

New Whole Wheat Pizza Dough

I've been wanted to try out a new pizza dough recipe for a while. I love my old one, but wanted to try out something new. Last week, I finally did. This recipe is a bit thicker than my other recipe. We like thin crust pizza, but this was a good change and it was liked by all. I was talking to a friend last week about pizza dough and I realized that we don't even realize we're eating whole wheat pizza dough. I've only been using whole wheat dough for years now and we all love it. It makes me feel a little bit better about pizza, ha! I think you'll like this pizza crust, give it at try. It is very thick when you're kneading it, my kitchen aid mixer wanted to give up on me, but it made it through it. Tomorrow I'll share the recipe for the pizza in the picture below, it was so good!!


Whole Wheat Pizza Dough
from Casual Cuisine


Ingredients:
6 cups wheat flour (I use white whole wheat flour.)
2 1/4 cup water (temp 110-115 degrees)
1/3 cup oil
1/3 cup honey
1 tablespoon yeast
2 teaspoons salt

Directions:
In the bowl of a stand mixer, combine the water, oil, honey, and salt. Mix until well blended. Next, add half of the flour. Mix until just blended. Add the yeast, mix again until just combined. Add remaining flour and mix until just blended. Let it rest for 10 minutes. Knead for 6 minutes more using dough hook. (This can be done by hand if you don't have a mixer.) Once the dough has finished kneading, divide it into 2 or 3 dough balls. It makes enough for 2 thick crust pizzas or 3 thinner crust pizzas. This dough also freezes well. 

To bake the pizza, roll out the dough, add sauce, cheese, and other toppings, and bake for 10-15 minutes in an oven preheated to 425 degrees F.

Friday, June 8, 2012

Fresh Broccoli Salad

Yesterday I bought 25 pounds of fresh, organic broccoli from a local farm here where I live. They had too much so I got a good deal. Do you know how much broccoli 25 pounds is? It is a lot! I spend a lot of my day blanching and freezing all my broccoli so I could use it with our dinners in the future. I saved a few broccoli crowns to make a broccoli salad. One of my cooking clubs met last night and I was able to try out not one, but two different broccoli salads, for the *gasp* first time ever. I did not know what I was missing. Please make this salad. It is delicious. It is so fresh and light, and you can add your favorite nut or raisin/craisin/golden raisin, etc. that you would like. I chose raisins and almonds because I actually had those in my pantry. So with all the broccoli that is in season right now, let's make some broccoli salad! Enjoy!


Fresh Broccoli Salad
inspired from multiple recipes


Ingredients:
3 broccoli crowns, washed and cut into bite size pieces
2 medium carrots, cut into bite size pieces
1/2 onion, diced
3/4 cup raisins
3/4 cup almonds, chopped
1 cup mayonnaise
2 tablespoons apple cider vinegar
1/4 cup sugar
2 tablespoons Dijon mustard
salt and pepper to taste

Directions:
In a large bowl, combine mayonnaise, vinegar, sugar, mustard, and salt and pepper. Add in chopped broccoli, carrots, onion, raisins, and almonds. Stir until all of the mixture is coated. Cover and put in refrigerator until chilled.

Wednesday, June 6, 2012

Bruschetta {cooking club}

Have I mentioned that I participate in not only one, but two cooking clubs? I feel like I'm always sharing things from them! ha! I  made this for one of them a couple of weeks ago. We had a picnic theme at a local farm. It was a gorgeous night with delicious food. This was my second time making bruschetta, and it turned out delish! This is a perfect treat for summer since tomatoes are just about in season! I also love the added touch of cooking the bread in some butter, I think it really added to the great taste of this bruschetta. Enjoy!


Bruschetta 
slightly adapted from Pioneer Woman


Ingredients:
2 Tablespoons Olive Oil
5 cloves Garlic, Finely Minced
7-8 tomatoes, diced (your favorite kind)
1 Tablespoon Balsamic Vinegar
16 whole Basil Leaves, cut into to small strips
Salt And Pepper To Taste
1 whole Baguette
8 Tablespoons Butter
1/4 cup fresh shredded Parmesan cheese

Directions:
In a small skillet, heat olive oil over medium-high heat. Add garlic and stir, lightly frying for about a minute until fragrant. Pour into a mixing bowl and allow to cool slightly. Add tomatoes, balsamic, basil, parmesan cheese, and salt and pepper to the bowl. Toss to combine, then taste and add more basil if needed, and more salt if needed (don't oversalt). Cover and refrigerate for an hour or two, or serve immediately if you need to. 

Cut the baguette into diagonal slices. Melt half the butter in a large skillet and grill half the bread on both sides. Cook till golden brown on both sides. Repeat with the other half of the butter and the other half of the bread. 

To serve, stir the tomato mixture one more time and the spoon generously over the slices of bread. Top with more Parmesan cheese if you want!

Monday, June 4, 2012

The Very Hungry Caterpillar Birthday Party

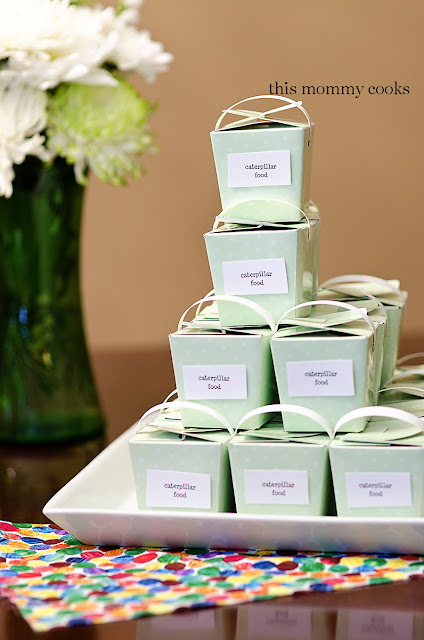
This weekend we celebrated my baby girl turning one! I chose The Very Hungry Caterpillar as the theme. I had hoped to be able to do lots of fun things with the food to coordinate with the book, but I got really busy, and wasn't able to do it. There are so many cute ideas to do with this birthday party theme. I think my favorite thing about the party was my girlie's outfit. I ordered the fabric on ebay and had a friend applique a "1" on the onesie. I made a colorful tutu and also made her hat, which she didn't really want to keep on, but I did manage a picture! We served hamburgers and hot dogs with red potato salad and homemade salsa and chips (recipes are on the blog.). We also had watermelon, strawberries, and colorful goldfish. We had chocolate and vanilla cupcakes and the smash cake was a banana cake (recipe to come) served with ice cream.  The party favors were little boxes (from the dollar tree) with mini m&ms inside labeled as "caterpillar food." We had planned to make caterpillar bookmarks, but didn't get around to it. It was just a family party, so all the kids just ran around and played. But, I do have a picture of what we were going to do. I also placed pictures of her throughout the year on the tables with extra circles from the invitation. This theme was so much fun. You can do as much or as little as you want and it still turns out great!


LinkWithin

Related Posts with Thumbnails