Tuesday, September 27, 2011

Cookie Ice Cream Cake {sweet treat tuesday}

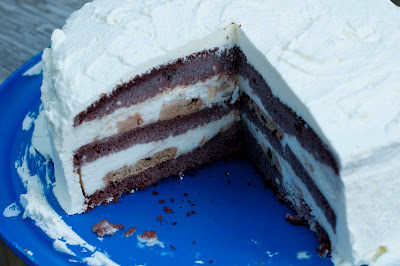
Every year I make my husband an ice cream cake. Every year I make it a little different. This year was no different, and we had great results. I wanted it to look prettier than it usually does, so I made it a round ice cream cake and used a springform pan to help me do it. It really is simple to make. It can be adapted to whatever flavor you like, which in my opinion is awesome! So, if you've never made an ice cream cake before, this is your chance. Super easy and super good! We used chocolate cake (from a box) and strawberry cheesecake ice cream.


Cookie Ice Cream Cake

Ingredients:
3/4  of a 9 inch round prepared cake (You'll cut the layers in half and use three of them.)
chips ahoy chocolate chip cookies
milk
ice cream of your choice
Homemade Whipped Cream (or cool whip for ease)

Directions:
Choose the cake you prepared, homemade or box, it doesn't matter. You will only need 3/4 of it. Slice the two 9 inch layers in half with a large knife. Place one of the layers in a springform pan. Next, pull out your cookies and milk. Just like in the Cookie Dough Pie here on the blog, you're going to quickly dip each cookie in milk and then layer it on top of the cake. I'm talking quick. Dip the cookie, shake the excess milk off, and place it on the cake. Do this until the cake is covered.

Next, soften your ice cream in the microwave. Spread a layer on top of the cookies until they are all covered. Now, repeat the steps. After you've repeated them, use your third cake layer to top the whole cake. Wrap the whole pan very well in plastic wrap and then in foil. Place in freezer for at least 4 hours.

Once the cake has hardened, remove it from the freezer and release the springform pan. The bottom of the pan will still be attached. I used a knife to carefully pry it off of the cake. Now it's time to ice the cake with your whipped cream. I like to make my own whipped cream, but I'm sure you could use Cool Whip if it's easier for you. Cover the whole cake with whipped cream.

Cover the cake by putting it in a cake saver or a large tupperware bowl turned upside down. Place the iced cake back in the freezer to harden, maybe 30 minutes or so. Now it's ready to eat! Enjoy!

Saturday, September 24, 2011

Homemade Ricotta Cheese {Cooking Club}

I have never even thought about making my own cheese until I had this amazing appetizer at a local restaurant here. I wanted to go home and recreate it immediately, but knew I would have to have a quality ricotta cheese. The store-bought stuff wasn't going to be good enough for this, so it kind of got pushed back in the "to try" file until I got around to making my own ricotta of finding a good one. Well, I saw this post on another site and knew I had to make it. I finally got around to it when my cooking club was going to meet and the theme was "local." I had planned on making an appetizer that used "local" honey and this ricotta cheese. This stuff turned out amazing. It was so tasty! And let me tell you this, it wasn't hard to make, I promise! I don't have cheesecloth, nor do I know where to find it at the store (I've been told that it's easily found in grocery stores.) so I used a coffee filter over a mesh strainer. You need to make this, I'll post the appetizer that I made soon, it was very easy too, and quite the hit at cooking club. Yum!!


Homemade Ricotta Cheese
from Smitten Kitchen

Ingredients:
3 cups whole milk
1 cup heavy cream
1/2 teaspoon sea salt
3 tablespoons freshly squeezed lemon juice

Directions:
Pour the milk, cream and salt into a saucepan. Attach a candy or deep-fry thermometer for ease. I don't have either of those, so I occasionally put my meat thermometer in the mix to test the heat. Heat the milk to 190°F, stirring it occasionally to keep it from scorching on the bottom. It got to 190 just as it was starting to boil.  Remove from heat and add the lemon juice, stir it gently and slowly. Let the pot sit undisturbed for 5 minutes. Line a colander with a few layers of cheesecloth or a coffee filter and place it over a large bowl (to catch the whey). Pour the curds and whey into the colander and let the curds strain for at least an hour. At one hour, you’ll have a soft, spreadable ricotta. Let it strain until it is at the consistency that you like. It will firm as it cools, so do not judge its final texture by what you have in your cheesecloth or filter. Eat the ricotta right away or transfer it to an airtight container and refrigerate until ready to use.

Thursday, September 22, 2011

Seasoned Tilapia with Dill Sauce

Have I mentioned how much I love pinterest? Seriously, I do. I've been finding some awesome things on there. If you're on pinterest, then you can follow me if you'd like. This is one of the awesome things I've found. Oh my, this was amazing. Usually broiled tilapia parmesan is my favorite way to make tilapia, even though I haven't made it in awhile, but this has now become my favorite way to prepare tilapia. I can't stop thinking about it. And the sauce, oh the sauce, it is what made this so unbelievably good. My hubby put it on everything on his plate he loved it so much! Please try this. I know you won't be disappointed.


Seasoned Tilapia with Dill Sauce

*note: I halved this recipe, so it works doubled as well.

Ingredients:
For the sauce:
1/8 cup mayo
1/4 cup sour cream
1/8 tsp garlic powder
1/2 Tbsp fresh lemon juice
1 Tbsp chopped fresh dill (1/2 Tbsp dried dill weed) 
dash of salt

For the fish:
1 Tbsp paprika,
1/2 Tbsp onion powder,
1/2 tsp sea salt,
1/2 tsp dried oregano,
1/2 tsp thyme,
1/2 tsp black pepper,
1/4 tsp garlic powder,
1/4 tsp celery seed (I used 1/8 celery salt because that's what I had.)
ground cayenne pepper to taste
1/2 pound tilapia (3 large fillets) 
1/8 cup extra virgin olive oil.

Directions:
For the sauce:
Combine all ingredients in a bowl and mix well. Cover and refrigerate for at least one hour.

For the fish:
Mix all seasonings together in a small bowl. Place fish in a shallow baking dish sprayed with nonstick spray. Sprinkle seasonings on top of fish covering completely, flip the fillets over and season the other side. Place in fridge for 30 minutes.

When ready to cook, heat olive oil in skillet for a couple of minutes. Add in fish and cook on each side for 4 minutes, or until fish is cooked through and flakes easily. Remove from pan, letting the excess oil drip off. You could drain it on paper towels to be a tad bit healthier.

When ready to serve, place on a plate and top with dill sauce. Go ahead and put the bowl of dill sauce on the table, because you'll want more than you think. That stuff is so good!

Tuesday, September 20, 2011

Sweet Treat Tuesday-Sweet and Salty Halloween Treats {Repost}

I posted these last year, but they have been a hit on the blog lately, thanks to pinterest, and I thought I'd share then again since fall is upon us. They are so easy to make and yummy to eat! You could use an M&M in the center as well, but I love the candy corn, it's so festive!


Sweet and Salty Halloween Treats
from Baking and Creating with Avril

Ingredients:
Mini Pretzels (I used the snaps, shaped like squares, but you could use the twists too.)
Hershey Kisses Hugs (any kind of kisses would do)
Candy Corn

Directions:
Preheat oven to 350 degrees F. Line a cookie sheet with parchment paper or foil. Place pretzels on cookie sheet, not touching. Unwrap Hershey's Kisses and place on top of pretzels and then place filled cookie sheet in oven. Bake for 3-5 minutes but no longer.You will know they are ready when the Hershey Kisses start to get shiny. Take out of oven and gently place candy corn on top of Hershey Kisses, pushing down ever so gently. Cool and then transfer to serving platter or wrap up as gifts. I actually placed mine in the fridge for a few minutes to speed up the cooling process, and it worked perfectly.

This recipe has been linked to Recipe Swap Thursday at Prairie Story and Tasty Traditions .

Monday, September 19, 2011

Pigs in a Blanket with Homemade Blankets

Pigs in a blanket you say? Do you really need a recipe for that? Exactly, you don't really need a recipe for hot dogs and crescent rolls now do you? Well these are special. The blankets for these dogs are homemade and taste better than any crescent roll can even come close to. I remember my mom making these with crescent rolls as a kid. She would slice the hot dogs a little and put some sliced cheese in them before rolling them up in the crescent roll. The neat thing about these? There is cheese in the bread mixture so that extra step is gone. These don't require any yeast, and really take no time at all to make them. Throw in some "healthy" hot dogs (I use nitrite-free all beef hot dogs.) and you're not too unhealthy.

*Note: The dough for this recipe makes a ton. I only made 5-6 pigs in a blanket and then rolled the others up without hot dogs and used then for dinner the next night. They are so yummy!


Pigs in a Blanket with Homemade Blankets
from Food.com

Ingredients:
2 cups all-purpose flour
1 tablespoon sugar
2 teaspoons baking powder
1/2 teaspoon baking soda
1/2 teaspoon salt
4 tablespoons unsalted butter, cold, cut into small pieces
1/2 cup grated cheddar cheese
3/4 cup buttermilk
18 miniature hot dogs or 8-10 regular sized hot dogs

Directions:
Preheat the over to 400ºF. Grease a large baking sheet. In a large mixing bowl, sift together the flour, sugar, baking powder, baking soda and salt. Using a pastry cutter or two knives, mix butter pieces into the dry ingredients until mixture is crumbly. Stir in cheese until evenly distributed. Make a well in the dry ingredients and add the buttermilk. Stir well with a wooden spoon or spatula. Let the dough rest for 3 minutes. Sprinkle the dough with flour and stir once or twice then place onto a well floured counter.With floured hands, pat the dough into a 15 by 7 inch rectangle, trimming the sides if necessary to get a true rectangle. Handle the dough as little as possible for tenderness. Using a pizza cutter, slice the rectangle into thirds horizontally. If using full size hot dogs, then do large triangles now, if not then slice each of those rectangles into thirds vertically, this will give you 9 small rectangles. Slice each rectangle diagonally into two thin triangles. It isn't rocket science, just cut triangles with the dough if the instructions give you a headache like they gave me one! One at a time, roll up the sausages or hot dogs in the triangles. Bake for 12 to 13 minutes, until golden brown. Cool on the sheet for 3 minutes then serve warm!

Thursday, September 15, 2011

Verde Salsa Chicken Tacos {Slow Cooker}

I've got another slow cooker recipe for you guys! I actually made this forever ago and never posted it. These were so easy to make and pretty tasty. They don't have a ton of flavor, but I attribute that to it being green salsa instead of red. Now, I'm  not saying these didn't taste good, they did, but there isn't an abundance of flavor, that's where the toppings come in. You could use the meat for just about anything in this recipe, not just tacos; enchiladas, quesadillas, topping on a salad, the possibilities are endless. I will note that I halved this recipe when I originally made it and halved everything except the green chilies, I still used a whole can of those. Enjoy!


Verde Salsa Chicken Tacos {Slow Cooker}

Ingredients:
2 pounds of boneless skinless chicken (I always use breasts.)
1 onion, diced
1 (16 oz.) jar of salsa verde
1 (4 oz.) can diced green chilies
1 tsp ground cumin
2 cloves of garlic, minced
tortilla shells, soft or hard
Toppings of your choice: shredded cheese, sour cream, guacamole, pico de gallo, salsa, etc.

Directions:
Place chicken in slow cooker. Top chicken with the diced green chiles, cumin, onion and garlic. The pour the salsa over the chicken. Cover and cook on low for 8 hours. Either shred chicken in the slow cooker, or remove and shred on a plate. If you remove it from the slow cooker, mix in enough of the leftover juice with the the meat to keep it moist. Spoon chicken into tortillas and top with your favorite toppings.

This is linked to It's a Keeper

Wednesday, September 14, 2011

Baked Beans

These beans are amazing! My friend, Kim, recently brought them to a pot luck that our small group was having. Let me just say they were a hit! I love the addition of sausage to them. It makes them even better. Please make these next time you have a cookout or a pot luck. I know I will be, as long as Kim won't be bringing them! yum!


Kim's Baked Beans
from my friend Kim

Ingredients:
1/2 lb pork sausage
1/2 C diced onion
32oz baked beans (I use bush's original)
15 oz black beans (rinsed and drained)
1/2 C brown sugar
1/2 C hickory smoked BBQ sauce
1/3 C ketchup
1/4 C spicy brown mustard
1/4 C molasses
1 t. chili powder

Directions:
Preheat oven to 350 degrees.

In a skillet, cook sausage and onion together until sausage is browned and cooked through. Drain off fat and discard.

In a large bowl, add in the remaining ingredients and mix with sausage and onion. Pour into a large casserole dish and cover. Place in preheated oven and bake for 2 hours.

Tuesday, September 13, 2011

{Sweet Treat Tuesday} French Toast Casserole with Strawberry Pecan Topping

Oh mercy. This casserole was delish! I found a website with a ton of bed and breakfast recipes and I think I'm going to be in trouble because I want to try so many of them! I needed to find a new recipe to bring to our first MOPS meeting of the year and I chose this one. I've never made a french toast casserole, but I've always wanted to, so this was my chance. As I wrote on facebook, I almost always try out new recipes when I go to gatherings. Do you do that? I mean usually you take a tried and true recipe to potlucks and meetings, but not me. I always want to try something new so I can have something new for the blog! Well, I am glad I tried this one because I can't wait to make it again. The original recipe calls for blueberries, but I wanted to do strawberries and it was definitely a good substitution. I bet you could use a lot of different fruits as the topping, blueberries, strawberries, blackberries, raspberries, etc. Definitely make this, even if you have to halve it for your family. It will be a hit!


French Toast Casserole with Strawberry and Pecan Topping
adapted from bedandbreakfast.com

Ingredients:
Casserole:
1 1/2 loaves French or Italian bread, sliced into 1-inch pieces
1 tablespoon unsalted butter, softened (to coat baking dish)
8 large eggs
2-1/2 cups whole milk
1-1/2 cups heavy cream
1 tablespoon granulated sugar
2 teaspoons vanilla extract
1/2 teaspoon ground cinnamon
1/2 teaspoon ground nutmeg

Topping:
4 tablespoons (1/2 stick) unsalted butter, softened
3/4 cup packed light brown sugar
1-1/2 tablespoons maple syrup (corn syrup or honey would work too)
1 cup pecans, chopped coarse
1-1 1/2 cups sliced strawberries*

Directions:
Casserole:
Preheat oven to 325 degrees F. Spread the bread cubes in a baking pan and bake for 15 minutes or until dry and hard. Remove from oven and let cool.

Butter a 13 x 9 inch baking dish and pack the dried bread cubes into it. In a large bowl, whisk the eggs until lightly beaten. Add in the milk, cream, granulated sugar, vanilla, cinnamon, and nutmeg. Pour the egg mixture over the bread cubes, distributing it evenly. Push the bread down into the egg mixture until all the bread pieces are well coated. Cover and refrigerate overnight.

Topping:
To make the topping, mash the butter, brown sugar, and syrup together until smooth and then stir in the pecans. Wrap in plastic wrap and also refrigerate overnight. (This can be made the next morning if you prefer.)

When ready to bake, preheat oven to 350 degrees F. Uncover the casserole and bake in preheated oven for 45 minutes. **Remove from oven and sprinkle strawberries on top and then the pecan topping mixture. Place casserole back in the oven and bake for another 15 minutes until golden brown and bubbling. Serve immediately. You can choose to drizzle maple syrup on top if you want, but I thought it was just fine without it.

*You can choose to use another fruit, the original recipe calls for blueberries.

**Note: You may want to place the casserole dish on a baking sheet in case it bubbles over, mine did.

This is linked to It's a Keeper.

Saturday, September 10, 2011

Lemon Garlic Tilapia

This was easy, and delicious. I love finding new recipes for fish, because I know it's so good for us. And you know what? My kids really like tilapia. My three year old asked for seconds! I always love it when that happens. So try this out soon!


Lemon Garlic Tilapia
adapted from All Recipes

Ingredients:
4 tilapia fillets
2 lemons
4 tablespoon butter
2 clove garlic, finely chopped
2 teaspoon dried parsley flakes
salt
freshly ground pepper to taste
4 teaspoons Parmesan cheese

Directions:
Preheat oven to 400 degrees F. Spray a baking dish with non-stick cooking spray. Rinse tilapia fillets under cool water, and pat dry with paper towels. Season with salt and pepper and place fillets in baking dish. Melt butter in small sauce pan of skillet. Add garlic and parsley. Cook, stirring constantly, until garlic is slightly cooked and fragrant. While butter mixture is cooking, squeeze 1/2 of a lemon over each fillet, then pour the butter mixture evenly over each fillet. Bake in preheated oven until the fish is white and begins to flake easily. Sprinkle 1 teaspoon of Parmesan cheese on top of each fillet, and bake another 2-3 minutes.

This is linked to It's a Keeper

Thursday, September 8, 2011

Vegetable Beef Soup

Last week I was trying to figure out what to have for dinner when I remembered that I had stew meat in the freezer. I had originally planned on making crock pot beef stew with that, but it was too late in the day to do a crock pot meal, so I decided to look on google for a soup recipe instead. I adapted the original recipe a bit, but man was it good!! I can't wait to make this a lot this fall and winter. I served it with mini cornbread muffins and they were perfect! I can't wait to make this again. The boys liked it too, especially the mini muffin part, they are all about bread!


Vegetable Beef Soup
adapted from tablespoon.com

Ingredients:
1 tablespoon vegetable oil
 3/4 pound beef stew meat, cut into 1-inch pieces
1 medium onion, chopped (1/2 cup)
3 cups beef broth/stock (I used one whole 32-ounce carton)
1 cup chicken broth/stock
2 tablespoons chopped fresh thyme leaves or 2 teaspoons dried thyme leaves
1/2 teaspoon pepper
2 bay leaves
1-2 cans (15 to 16 ounces) navy beans, rinsed and drained (I used 1 because that's all I had.)
 4 medium carrots, cut into bite size pieces
2 medium celery stalks, cut into bite size pieces
1 cup frozen peas

Directions
Heat oil in Dutch oven, or big pot, over medium-high heat. Cook beef and onion in oil about 15 minutes, stirring frequently, until beef is brown.

Stir in both  broths, thyme, pepper, and bay leaf. Heat to boiling; reduce heat. Cover and simmer about 45 minutes, stirring occasionally, until beef is almost tender.

Stir in beans, carrots and celery. Cover and simmer about 30 more minutes, stirring occasionally, until vegetables are tender. Remove bay leaves before serving.

I served this with mini cornbread muffins.

This is linked to It's a Keeper

Tuesday, September 6, 2011

{Sweet Treat Tuesday} Peach Pie

A little while after my baby girl was born, my sweet friend brought us an amazing dinner. This said dinner included an whole homemade peach pie. It was divine. Thankfully we were having our fellowship group over that night, so we served it as dessert topped with vanilla ice cream so we weren't stuck eating this entire delicious pie. It was just that, delicious. I love peaches, but I don't eat them enough. I should probably do something about that. I did just buy a few pounds of organic peaches per my son's request, so at least we have them in the house now. After reading through the directions, you may be overwhelmed, but that's just America's Test Kitchen speak, who really cares if your dough is rolled out to a specific size, not me. It is really a simple recipe, all about choosing good peaches and a nice flaky pie crust. Yum! I foresee a peach pie being made at my house in the near future!


Homemade Peach Pie
from The Complete America's Test Kitchen TV Show Cookbook

Ingredients:
1 recipe double-crust pie dough (you could use the roll out dough at the grocery if you wanted to)
flour for work surface
2 1/2 pounds ripe peaches (6-7 medium), peeled, pitted, and sliced 1/2 inch thick
1 cup, plus 1 TBSP sugar
1 TBSP cornstarch
1 TBSP juice from one lemon
pinch ground cinnamon
pinch ground nutmeg
pinch table salt
1 large egg white, lightly beaten

Directions:
Roll one disk of dough into a 12-inch circle on a lightly floured work surface, then fit it into a 9-inch pie plate, letting the excess dough hang over the edge; cover with plastic wrap and refrigerate 30 minutes to an hour.

Roll the other disk of dough into a 13 1/2 by 10 1/2-inch rectangle, then transfer to a parchment-lined baking sheet. Trim the dough to a 13 by 10-inch rectangle with straight edges and slice it lengthwise into eight 13-inch long strips. Separate the strips slightly, cover with plastic wrap, and freeze until very firm, about 30 minutes. *Note: You don't have to do a lattice crust on top, you could just put the second disk of dough on top and cut slits in the top to let steam escape.

Toss the peaches and add 1 cup of the sugar together in a large bowl and let sit, tossing occasionally, until the peaches release their juice, about 1 hour. Adjust an oven rack to the lowest position, place a rimmed baking sheet on the rack and heat the oven to 425 degrees.

Drain the peaches thoroughly through a colander, reserving 1/4 cup of the juice. In a large bowl, toss the drained fruit, the reserved juice, cornstarch, lemon juice, cinnamon, nutmeg, and salt together until well combined.

Spread the peaches into the dough-lined pie plate and weave the chilled strips of dough over the top into a lattice. Let the strips soften for 5 to 10 minutes, then trim, fold, and crimp the edges. Lightly brush the lattice with the egg white and sprinkle with the remaining 1 tablespoon of sugar.

Place the pie on  the heated baking sheet and bake until the top crust is golden, about 25 minutes. Reduce the oven temperature to 375 degrees, rotate the baking sheet, and continue to bake until the juices are bubbling and the crust is deep golden brown, 25 to 35 minutes longer. Let the pie cool on a wire rack until the filling has set, about 2 hours; serve slightly warm or at room temperature.

This is linked to It's a Keeper

Friday, September 2, 2011

Labor Day Recipe Ideas

Last year before Labor Day I posted some ideas for your weekend menu. I have taken that post and added a couple of newer recipes as suggestions. Hope you all enjoy your long weekend with friends and family!  Just click on the names above the pictures for the recipes.


Thursday, September 1, 2011

Gardener's Pie {Vegetarian}

We are meat eaters here at my house. My husband especially. Occasionally, I can pull off a no-meat dinner and hear no complaints, but I know not to do it too often. A couple of weeks ago a friend of mine was blessed with her third child and I wanted to take her and her family dinner. The catch is that they are vegetarians! I knew I would be taking her dinner well in advance so I started searching the web for yummy looking dinners for them. I came across a gardener's pie, which is basically like shepherd's pie but without the meat and lots of veggies in it. My family loves shepherd's pie, so I thought it would be a good choice for them. I did actually send her a couple of recipes to choose from, and she chose this one as well. I made a very small one for us to have as a side dish along with some salmon cakes so I wouldn't hear too much complaining from my husband or kiddos. It was quite tasty and my friend and her family enjoyed it too! Score! Now I get to share a vegetarian dish with you guys, because I know some of you guys prefer those too. This is hearty enough to have as a main dish since it contains beans, but you could definitely half it and serve it as a side dish to some grilled chicken or fish in my opinion.


Gardener’s Pie
adapted from Ezra Pound Cake

Serves 6

Ingredients:
Mashed Potatoes:
1 1/2 pounds red potatoes, cut into 1/2-inch dice*
1/4 cup heavy cream
4 tablespoons (1/2 stick) unsalted butter
3/4 teaspoon salt
1/4 teaspoon freshly ground black pepper
1 large egg yolk

Filling:
2 tablespoons canola oil
1 cup chopped onion
1/2 cup chopped green bell pepper
2 carrots, finely chopped
2 garlic cloves, minced
1 teaspoon salt
1/2 teaspoon freshly ground black pepper
2 tablespoons unbleached all-purpose flour
2 teaspoons tomato paste
1 cup vegetable broth
2 teaspoons chopped fresh rosemary or 1/2 tsp dried
1 teaspoon chopped fresh thyme or 1/4 tsp dried
1 (14-ounce) can red kidney beans, rinsed and drained
1/2 cup fresh or frozen corn kernels
1/2 cup fresh or frozen shelled green peas

*Russet or Yukon gold potatoes may also be used. Also if you prefer to peel your potatoes, then do so, I am too lazy to peel my potatoes.

Directions:
For the Mashed Potatoes:
Place the diced potatoes in a medium saucepan, and cover with salted cold water. Cover, and bring to a boil. Uncover, reduce the heat to medium, and simmer for 15 minutes, until the potatoes are tender. Drain the potatoes and put them back in the saucepan off of the heat.

Warm the cream and butter in the microwave for 35 seconds.

Mash the potatoes. Add the half-and-half and butter mixture, salt, and pepper, and continue to mash until smooth. Stir in the egg yolk. Set aside.

Preheat the oven to 400 degrees F.

For the Filling:
Heat the oil in a large skillet over medium-high heat. Add the onion, bell pepper and carrots. Cook, stirring, for 3 to 4 minutes. Add the garlic, salt and pepper. Stir in the flour, and keep cooking for another minute. Stir in the tomato paste, vegetable broth, rosemary and thyme. Bring the mixture to a boil. Add the kidney beans, reduce the heat to low, cover, and simmer until the sauce has thickened slightly, 10 to 12 minutes. Stir in the corn and peas.

Spread the vegetable mixture evenly in an 11-by-7-inch glass baking dish. Top with mashed potatoes, starting around the edges to create a seal to prevent the mixture from bubbling up, and smooth with a rubber spatula. Put the baking dish on a baking sheet. Bake for 25 minutes, or just until the potatoes begin to brown. Transfer to a wire rack, and let cool for at least 10 minutes before serving.

LinkWithin

Related Posts with Thumbnails