Friday, April 29, 2011

Flashback Friday- Sweet and Sour Chicken and Update

It has been a wild three weeks for me and my family. I wanted to do a quick update. As I have mentioned previously, my sister got married this month, so I was out of town for a long time getting ready for that. After returning home for 3 days, I received a phone call that my grandfather, who I am very close to and just stayed with for 10 days, was admitted to the hospital with double pneumonia. After being admitted, he took a quick turn for the worse, and a few short hours after I arrived the next day, he passed away. After a couple trips back home and back to Nashville for the funeral, a minor car accident (not my fault by the way), and terrible storms yesterday I am ready to lead a boring life, that is until my sweet baby girl arrives. (Which by the way is in less than 7 weeks!)   I appreciate your patience as I didn't have quite as many posts last week and thank you to my sweet friend Nancy at Casual Cuisine that did a guest post for me this week, I'm hoping things get back to normal next week.

Now that I've shared sad news, I want to share very exciting news. If you don't follow me on facebook, you probably haven't heard my exciting news. A few weeks ago, I found out that This Mommy Cooks is listed on Jamie Oliver's Food Revolution page under "food bloggers." This is big and exciting news because there are only 14 blogs listed, and mine is one of them! How cool is that??? If you don't know who Jamie Oliver is, he is big time! He has cooking shows and a prime time show on ABC called Jamie Oliver's Food Revolution. He is on a mission to get parents, schools, and just about everybody to eat healthier foods. I am honored to be listed on his site! If you haven't checked out his site, you should. I've begun watching his show on Tuesday nights and I am learning so much! I know you will too. And now that I've rambled enough here is my recipe for Flashback Friday.

This is one of my absolute favorite dishes I have on This Mommy Cooks. My family loves it and everyone who I know that has tried it has loved it as well. It is so delicious and paired with homemade fried rice makes this the perfect meal. Click here for the original recipe.


This recipe is linked to It's a Keeper Thursday and Prairie Story.

Thursday, April 28, 2011

Beef with Snow Peas

I had originally missed this recipe when Pioneer Woman posted it, but someone, I can't remember who, shared it with me on facebook as something they were having for dinner. I'm glad they did! I really liked this dish. My husband liked it, but he preferred teriyaki flavor to this more savory flavor. The flavor was a little strong for the boys, but they ate it, and I think they really liked the snow peas. I really love anything that involves "Chinese" food. The snow peas were excellent and crispy, so good! I had never cooked with them before, but they were easy and tasty. This is an easy week night meal so give it a try. Serve it over noodles or rice, I chose brown rice.


Beef with Snow Peas
from The Pioneer Woman

Ingredients:
1-½ pound Flank Steak, fat trimmed sliced very thin against the grain (I used thin cut sirloin.)
½ cups Low Sodium Soy Sauce
3 Tablespoons Sherry Or Cooking Sherry (I used cooking sherry.)
2 Tablespoons Brown Sugar
2 Tablespoons Cornstarch
1 Tablespoon Minced Fresh Ginger or 1/2 tsp ground ginger
8 ounces, weight Fresh Snow Peas, Ends Trimmed
5 whole Scallions, Cut Into Half-inch Pieces On The Diagonal
Salt As Needed (use Sparingly)
3 Tablespoons Peanut Or Olive Oil
Crushed Red Pepper, For Sprinkling
Rice, cooked according to package (I used brown rice.)

Directions:
In a bowl, mix together soy sauce, sherry, brown sugar, cornstarch, and ginger. Add sliced meat to bowl and toss with hands. Set aside.

Heat oil in a heavy skillet (iron is best) or wok over high heat. Add snow peas and stir for 45 seconds. Remove to a separate plate. Set aside.

Allow pan to get very hot again. With tongs, add half the meat mixture, leaving most of the marinade still in the bowl. Add half the scallions. Spread out meat as you add it to pan, but do not stir for a good minute. (You want the meat to get as brown as possible in as short amount a time as possible.) Turn meat to the other side and cook for another 30 seconds. Remove to a clean plate.

Repeat with other half of meat, allowing pan to get very hot again first. After turning it, add the first plateful of meat, the rest of the marinade, and the snow peas. Stir over high heat for 30 seconds, then turn off heat. Check seasonings and add salt only if it needs it. Mixture will thicken as it sits.

Serve immediately over rice. Sprinkle crushed red pepper over the top to give it some spice.

Tuesday, April 26, 2011

Guest Post: Sweet Treat Tuesday-Pineapple-Coconut Gelato

My friend Nancy from Casual Cuisine is guest blogging today! Thank you so much for sharing a new recipe Nancy! Visit her site for yummy, healthy recipes!

You know that whole thing about pregnant women and ice cream cravings? Well, I must be here to prove that it's true, because I'm just about to have another baby and in the past  two weeks, I've made several batches of the stuff! I just cannot get enough fruity, frothy desserts lately, and this is the most recent recipe I've tried. When I came across the recipe, I immediately knew I had to try it because it just sounded so good and refreshing, not to mention extremely easy to make. I'm not normally a huge fan of coconut on its own, but I do love it when added to other tropical flavors, so the coconut milk base in this recipe is, in my opinion, a wonderful compliment to the pineapple. This dessert is just so tasty yet not too rich or heavy, and the texture could probably be described as in between a sorbet and sherbet. My family just loves this recipe, so when I talked to Amber about guest posting today, my mind went immediately to this one as a great dessert to share with you all. And with warm weather finally here and summer just around the corner, it is a great one to try out.

One other reason that I thought it would be fun to try this recipe is because growing up, I always loved getting the famous Dole Whips at Disney World's Magic Kingdom. I've searched for a good recipe to compare it to, but have never had any luck (mostly because the whip is actually a prepackaged concoction that you have to order rather than simple ingredients...as you can tell, I've done some research ;)!). So when I saw this recipe, I had that delicious Dole Whip in the back of my mind in hopes that it might taste similar. Well, I thought it did, and without even saying anything to him about it, my husband said it kind of reminds him of a Dole Whip. I started laughing and told him that is what I thought, too! So, if you like Dole Whips, you will most likely love this recipe. And if you've never had one but love a good refreshing, fruity dessert, this one will not disappoint! 

I recently made a strawberry gelato that we can't get enough of as well-I've made several batches of it and everyone who has tried it has loved it, so I highly recommend it, especially with strawberries being in season. For that and other recipes, feel free to visit my cooking blog, Casual Cuisine. I love trying new fun, practical, family friendly recipes and sharing them!

Pineapple-Coconut Gelato
Slightly adapted from this recipe from Cooking Light, found on Myrecipes.com

I N G R E D I E N T S :
1 1/2 cups sugar
1 1/2 cups water
1 (15 1/4-ounce) can crushed pineapple in juice, undrained
1 cup coconut milk (I bought reduced fat coconut milk in a can, which can be found in the asian food section of the grocery store.)


D I R E C T I O N S :
Combine sugar and water in a large saucepan; bring to a boil, stirring until sugar dissolves.

Remove from heat; cool completely.

Combine the pineapple and milk in a large bowl; stir in sugar syrup (I actually blended it together in a blender for a smoother texture, but either way would probably be fine).

Pour mixture into the freezer can of an ice-cream freezer, and freeze according to manufacturer's instructions. Spoon gelato into a freezer-safe container; cover and freeze 1 hour or until firm.


Thursday, April 21, 2011

Pan Fried Pork Chops

This is a classic pork chop recipe. Flour, seasoning salt, and pepper, it doesn't really get much easier than that now does it? I love how sometimes recipes can be so simple. A while back I made two different types of pork chops for dinner, this one and another one I'll be posting soon. Why did I do that to myself you ask? Well, I'm not a huge pork chop fan, and I thought since I had some, I had better try two different ways to make it and see if I liked either one. Thankfully, we liked both! This one is the easier of the two, not that the other is harder, but there are more than 3 ingredients. If you're looking for that classic pork chop recipe, that isn't dry like the oven bag kind, then this is your pork chop. My husband liked it and I'm sure you will too!


Pan Fried Pork Chops
from The Pioneer Woman

Ingredients:
3-4 Pork Chops (bone in and thin are recommended, I used a boneless chop.)
1/2 cup All-purpose Flour
1/2 teaspoon Seasoned Salt (I use Lawry's.)
1/2 teaspoon Black Pepper
Cayenne Pepper To Taste
1/4 cups Canola Oil
1 Tablespoon Butter
Extra Salt And Pepper, To Taste

Directions:
Salt and pepper both sides of the pork chops. (I used Kosher salt and freshly ground black pepper for this step.)

Combine flour, seasoned salt, black pepper and cayenne pepper. Dredge each side of the pork chops in the flour mixture, then set aside on a plate.

Heat canola oil over medium to medium-high heat. Add butter. When butter is melted and butter/oil mixture is hot, cook pork chops, about 2 to 3 minutes on the first side; 1 to 2 minutes on the other side. (Make sure no pink juices remain.) If you use thicker pork chops, it will take longer, and you may want to turn down the heat to prevent burning them. Remove to a plate and repeat with remaining pork chops.

Tuesday, April 19, 2011

Sweet Treat Tuesday-Easy Peach Cobbler Cake

Two weeks ago, I made homemade yellow cake mix. I made that especially for this recipe. I've been craving some sort of fruit dessert. I halved the recipe so I could try out the homemade cake mix separately. When I halved it, I used the full amount of soda. So, in the ingredients below, I wrote half to one whole can of soda for the full recipe. This was so good! And, so easy! It isn't healthy, besides the fruit, but sometimes it's worth it. I look forward to trying this with fresh peaches this summer!


Easy Peach Cobbler Cake
inspired from Mel's Kitchen Cafe

Ingredients:
1 homemade or boxed yellow cake mix
1 can Fresca, Sprite, or 7-Up (I used Sprite.)
1 stick of butter (or less if you want to be a tad healthier)
peaches (enough to cover the bottom of the baking dish, I would use at least 2 large cans, bigger than normal)

Directions:
Lightly spray a 9x13 pan or baking dish with cooking spray. Layer peaches (canned or fresh) on the bottom of the dish in a single layer. Sprinkle a yellow cake mix (homemade or box) over the top of the peaches. Dot the top of the cake mix with one stick of butter.This means to put a little chunks of butter all over the top. Open up can of Fresca, Sprite, or 7-Up half to a whole can over the top of the cake mix and butter. (I think I used the equivalent of 1 whole can when I made this recipe halved.) Bake at 350 degrees for 45 minutes, until golden brown. Serve warm with vanilla ice cream.

Saturday, April 16, 2011

Inside Out Ravioli

This recipe makes a ton! I was happy with the way this turned out, but I think it could have been better. I did not note this below, but next time I will add Italian seasoning to the spaghetti sauce and meat mixture, as well as add Parmesan cheese to the cheese mixture. It tasted good, but needed a little more flavor. Using homemade spaghetti sauce would probably solve this problem, but so would adding some more seasoning, garlic, and Parmesan cheese. It was a good way to get some more green in our dinner with the spinach mixed in with the pasta. Another thing I may add, for our family's preference is more meat. As I've mentioned before, my hubby loves meat! I think with the added spices, and another pound of ground meat, I will make this into two dinners, freezing one for later. Give this a try with the changes and I think you'll be happy.


Inside Out Ravioli
adapted from Casual Cuisine

Ingredients:
1 (10-oz) pkg. frozen chopped spinach, cooked according to pkg. directions-reserve the water from cooking.
1 lb. ground turkey or beef
1 medium onion, chopped
1 (15-oz) jar spaghetti sauce (or your own homemade)
1 (8-oz) can tomato sauce
1 (6-z) can tomato paste
1/2 cup Italian bread crumbs
2 TBSP oil
1/2 cup sour cream
1/2 cup shredded cheddar cheese
1/2 cup shredded mozzarella cheese
1 (8-oz) package penne, ziti, shell or macaroni pasta (I used whole wheat penne.)

Directions:
Bring a pot of water to a boil, and cook pasta according to package directions.

Meanwhile, cook spinach according to package directions; drain well, reserving liquid. Set aside.

Brown ground turkey or beef with onion. Once finished, add spaghetti sauce, tomato sauce, tomato paste, and spinach liquid (I only added about half of the spinach liquid because the bag was so hot!). Simmer for 10 minutes. This is where I would add in Italian seasoning and garlic.

Combine cooked spinach with bread crumbs, sour cream, oil and cheeses. (I would add Parmesan cheese here.) Mix well and add to cooked pasta. Pour meat sauce over top of pasta mixture, and stir until combined.

Spread in 9x13 baking dish (or two 8x8 or small round pans).  I would also sprinkle some Parmesan cheese on top here too.

Bake at 350 degrees for 25-30 minutes.

Serves 6-8

Friday, April 15, 2011

Flashback Friday- Baked Spaghetti

I posted on Facebook this week that I am going to start posting recipes from way back when since I have a lot new followers these days. Maybe I'll try to do them on Fridays, since Flashback Friday is a pretty cute title. =) Just click on the title below and it will take you to the recipe. Let me know what you think. Do you like this idea?


Thursday, April 14, 2011

Breaded Garlic Chicken in Lemon Butter Sauce

Score another for Mel at Mel's Kitchen Cafe! This chicken was really yummy! Crispy on the outside, juicy on the inside. I'm finding that using a meat thermometer to check and see if my meat is done is a way better way to check "doneness" than baking it until it's dry! I did double the sauce for this recipe. I have noted that in the ingredients below. If you don't like a lot of sauce, then you can scale all the sauce ingredients down by half. I wanted to serve this over pasta, which I did, so that's why I definitely wanted to double the sauce. Here's another recipe for baked chicken to put in your arsenal, it was a winner here!


Breaded Garlic Chicken in Lemon Butter Sauce
slightly adapted from Mel's Kitchen Cafe

Ingredients:
4 boneless, skinless chicken breasts
1 cup seasoned flour (1 cup flour, 1 teaspoon salt, ½ teaspoon pepper)
10 cloves of garlic, finely minced (I may have used a little less, I'm not sure.)
3 eggs
1/3 cup finely grated Parmesan cheese
9 tablespoons butter
2 tablespoon parsley flakes or 1/2 cup chopped fresh parsley
4 tablespoons lemon juice, about the juice from 1 lemon
1 tablespoons olive oil

Directions:
Place the seasoned flour in a shallow dish or a large gallon-size Ziploc bag. Set aside. In a bowl, beat the eggs until mixed and add the Parmesan cheese. Whisk to combine. Set aside.

In a large skillet (I used my cast iron skillet.), melt one tablespoon butter and one tablespoon olive oil over medium heat. Let it begin to heat and sizzle while you prepare the chicken but be careful not to let the butter burn and turn brown.

Dredge the four chicken breasts in the seasoned flour or place all 4 chicken breasts in the Ziploc bag, close the bag, and shake to coat the chicken in the flour. One by one, take the chicken out of the bag or dish and dip into the egg/Parmesan mixture. Place the chicken carefully in the skillet with the hot oil/butter. Repeat with the other chicken breasts. Let the chicken cook on the first side, without moving or flipping the chicken, for 1-2 minutes until a nice, golden crust has formed. Carefully, using a wide spatula, flip the chicken and let it continue to cook for 1-2 minutes on the other side until it is golden brown.

Place browned chicken in a 9x13-inch baking dish or pan. I sprayed my pan with nonstick spray. Set aside and make the sauce.

In the same skillet that you browned the chicken, melt the remaining four tablespoons butter. Add the minced garlic, lemon juice, and parsley. Simmer the sauce for 1-2 minutes, stirring and scraping up any browned bits that were on the bottom of the skillet.

Pour the sauce evenly over the chicken breasts and bake at 350 degrees for 35 minutes, until the chicken is cooked through. I served this over pasta and poured the sauce on the pasta too, delicious!

This recipe is linked to It's a Keeper Thursday, Tidy Mom
Fat Camp Friday 

Tuesday, April 12, 2011

Homemade Yellow Cake Mix

As I've mentioned before, we are *trying* to use less processed or boxed things and make more things from scratch at my house. There are still times when I choose easy over healthy, but all in all we are trying to move towards healthier choices. I would also like to say that I think butter is healthy. haha As opposed to margarine, so I only cook with butter. Now that I've said that, I can introduce you to homemade yellow cake mix, and call it healthier than a box, although it does have butter in it. That's what makes it so good! And it was good. I made it last week and divided it into two equal parts to make two different desserts. I ended up making cupcakes and they turned out great. I will warn you, I do think you have to have a food processor for this recipe. I have a small one, and did my main mixing in my stand mixer, and then did batches in the food processor. You have to get the butter processed very fine, and you can't really do that with a pastry cutter or even a blender. My blender wouldn't work at all. (If you're keeping count, yes I used A LOT of bowls and gadgets in the kitchen to figure out what would work best for this. I've come to the conclusion that I will be buying a real food processor for myself for my birthday!) So, go borrow one if you don't have one. You'll be so proud of yourself for making this cake without a box, it really isn't that hard! I promise!


Homemade Yellow Cake Mix
from Mel's Kitchen Cafe

*Makes enough for two 9-inch layer cakes (bake according to recipe), or one 9X13-inch cake (bake for 30 to 35 minutes), or one 12-cup bundt pan (bake for 40 to 45 minutes), or 24 cupcakes (bake for 18 to 20 minutes)

Ingredients:
2 cups granulated sugar
1 1/2 cups all-purpose flour
1 1/2 cups cake flour
1/2 cup nonfat dry milk powder
1 tablespoon baking powder
1 teaspoon salt
16 tablespoons butter (2 sticks), cut into 1/2-inch pieces and chilled
1 tablespoon vanilla extract

Directions:
Process sugar, flours (or flour and cornstarch if making the substitution for the cake flour), milk powder, baking powder, and salt in a food processor for 15 seconds to combine. Add butter and vanilla and pulse until the mixture resembles coarse meal (you want this much finer than, say, a pie crust). Freeze the dry mixture in a zipper-lock bag for up to 2 months or use immediately.

To make the cake:
Adjust an oven rack to the middle position and preheat the oven to 350 degrees. Grease and flour your pan of choice.

With an electric mixer, beat the prepared cake mix, 1 1/4 cups warm water and 2 large room-temperature eggs until the mixture is smooth, about 2 minutes. Scrape the batter into the prepared cake pan and bake until a toothpick inserted in the center comes out clean, about 25-27 minutes for two 9-inch layer cakes. See the note above the recipe for alternate cooking times with other baking pans. Cool the cake in pan for 10 minutes, then place on a wire rack. Cool completely.

This recipe is linked to It's a Keeper Thursday.Tidy Mom,
Fat Camp Friday

Saturday, April 9, 2011

Hawiian Pineapple Chicken

I made this on Wednesday. After devouring it, and my family devouring it, I bumped it up on the post list. (Just so you know, that's a big deal because we are well behind, maybe 20 recipes waiting to be posted here at This Mommy Cooks.) It was so delicious! It has a sweet sauce, but not too sweet. It was so perfect over brown rice. I actually pan fried the chicken and made the sauce, and poured 2/3 of the sauce over it, refrigerated it and then baked it an hour and half later, and it was delish! So, you can make ahead of time and pop in the oven since the oven time is around 45 minutes, this would help make it a quicker meal. Thanks Siggy Spice for this great recipe! I will note that my kids said they don't like "cooked pineapple" so I gave them some from the can. Kids can be so silly sometimes!  Definitely make this soon!


Hawaiian Pineapple Chicken

Ingredients:
4-5 chicken breasts cut into large strips
1/2 cup Flour
1 tsp Salt
1 TBSP Lemon Pepper
4 TBSP Olive Oil

For the sauce:
1 can (28 ounce) Pineapple chunks in 100 % juice. (I used a 20oz can and some juice from another can.)
1 1/4 cup Pineapple juice (use the pineapple juice from the can, and add water to measure 1 1/4 cup)
3/4 cup Apple Cider Vinegar
1 tsp low sodium Soy Sauce
1/4 tsp ground Ginger
1 Chicken Bouillon cube
1 cup Sugar
2 TBSP Cornstarch
1 medium Red Bell Pepper, cut into 1 inch pieces, optional
1/2 medium Sweet Yellow Onion, cut into 1 inch pieces, optional
Green Onion, optional garnish

Directions:
Preheat oven to 375 degrees and prepare a 9"x13" baking dish with non-stick spray.

Heat large skillet over medium-high heat and add oil. While skillet and oil are heating, mix together flour, salt, and lemon pepper. Once oil is hot, dredge chicken in flour mixture and quick fry the chicken until golden brown on both sides. Place chicken into the prepared baking dish.

Meanwhile, begin the sauce by bringing pineapple juice, vinegar, soy sauce, ginger, bouillon cube, sugar, and cornstarch to a boil in a saucepan over medium heat for 2-3 minutes, stirring occasionally.

Once all the chicken is in the baking dish, pour 2/3 of the sauce over top and bake for 30 minutes, turning the chicken over after 15 minutes.

While chicken is baking, quick stir-fry red pepper and onion together in a small amount of oil in a small skillet over high heat.

Once chicken has cooked for 30 minutes, take out of oven,turn chicken over again and add pineapple chunks, onion, and red pepper over top of the chicken evenly, then pour remaining sauce over that. Return to oven for an additional 15 minutes.

Serve over rice and garnish with green onion.

This recipe is linked to Potluck Sunday, It's a Keeper Thursday, Tidy Mom
Fat Camp Friday

Thursday, April 7, 2011

Homemade Corn Dogs

My 4 year old, excuse me 4 and a half year old, celebrated his half birthday in March and requested corn dogs for dinner. (Yes, we celebrate half birthdays. The person celebrating picks what he/she wants for dinner and dessert. Nothing fancy, but it's one more fun thing to do and allow me to cook fun stuff!) Being the person I am, I was not going to go to the freezer section and buy some. He's actually been asking me to learn how to make them for awhile. I wanted to find a recipe that didn't use a cornbread box mix in the ingredients, which a lot of them do. This one from A Cozy Kitchen does not. I did have a semi-difficult time getting the batter to stick, but after many swirls of the dog, I got it to work. I noted it below. These were not hard at all! Dinner was ready fast and I may actually do it again. Because, you know, I do like a good corn dog every now and then, this mommy loves hot dogs!


Homemade Corn Dogs
adapted from A Cozy Kitchen

Ingredients:
2/3 cups of all-purpose flour
1/2 cup corn meal (I used white buttermilk cornmeal.)
1 tablespoon of baking powder
1 teaspoon of salt
1/4 teaspoon of baking soda
1/4 teaspoon of cayenne
1 egg
3/4 cup of milk
4-6 hot dogs (I used all beef EarthFare no preservative, nitrite, or bad stuff.)
4 tablespoons of cornstarch (for dredging)
4-6 wooden skewers (cut to a 6 inch length)

Directions:
Get some tongs and line a baking sheet or plate with paper towels. (For the corn dogs after frying.)

Pour your oil in a cast iron skillet, dutch oven, or deep fryer. Heat over medium-high heat until your thermometer reads 375 degrees F. I do not have a thermometer, but after knowing my oil got to hot, I'm going to invest in one. You don't want the outside to cook to fast, because the inside will still be gooey and not cooked.

In a medium mixing bowl, whisk together the flour, corn meal, baking powder, salt, baking soda and cayenne. In a large bowl whisk the one egg and milk. Then add the dry ingredients to the wet ingredients all at once, mixing until just combined. The mixture will look a lot like pancake mix. Don’t over-mix and let it rest for 10 minutes. Note: I transferred the mixture to a skinnier cup. It makes it much easier to dip in the batter.

While your batter is resting, lay your cornstarch on a baking sheet or big plate. Place each hot dog on a skewer and roll in the cornstarch, being sure to pat off any excess. Then quickly dip the hot dog in and out of the batter. Immediately place the corn dog in the hot oil.

*Note- If your experience goes like mine, the dip will not be quick. The batter wouldn't stick very well, I had to roll it and dip it and do just about everything to get it coated, but eventually it worked. I tried one without cornstarch and the batter wouldn't stick at all, and I mean at all.

Cook until the coating is golden brown, 4-5 minutes.Since I cooked mine in a skillet, I had to turn/rotate my corn dogs throughout cooking to cook them evenly. Remove with tongs and place on paper towels for draining. Serve with ketchup and mustard.

This recipe is linked to It's a Keeper Thursday, Prairie Story, Tidy Mom , Potluck Sunday, and Fat Camp Friday

Tuesday, April 5, 2011

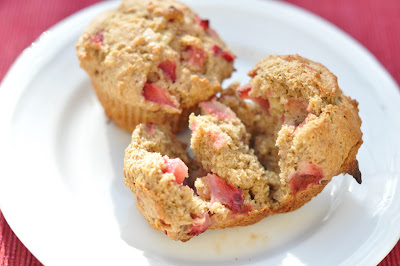
Sweet Treat Tuesday- Strawberry Banana Muffins and a WINNER!

First, I want to announce the winner of the Schwan's Dinner Giveaway! Thanks to everyone who entered! There were 54 entries. I used Random.org to choose a winner and number 46 was chosen. Which makes "La La" the winner! "La La" please contact me so I can get your contact info and get your free meal sent to you! Congratulations! If you didn't win, don't fret. I will be doing another giveaway at the end of the month or beginning of May involving more than one cookbook, so we'll have multiple winners! Now, for today's recipe!

Yet another muffin recipe to put in my favorites! Last weekend, I looked to see what kind of fruit we had and then googled a recipe and voila, yummy strawberry banana muffins! These were a hit with my boys, but they don't turn down many muffins. These are not overly sweet, but just perfectly sweetened.


Strawberry Banana Muffins
from Joy of Baking

Ingredients:
1/2 cup (1 stick) unsalted butter, melted
3/4 cup light brown sugar
2 large eggs, lightly beaten
1 teaspoon pure vanilla extract
2 large ripe bananas, mashed (about 1 cup)
1 cup fresh strawberries, cut into bite sized pieces
2 1/4 cups all-purpose flour (I used whole white wheat flour.)
1 1/2 teaspoons baking powder
1/4 teaspoon baking soda
1 teaspoon ground cinnamon
1/2 teaspoon salt

Directions:
Preheat oven to 350 degrees F. Position rack in center of oven. Line a 12 cup muffin pan with paper liners or grease with butter or a vegetable spray. Tip-I also spray the inside of my paper liners with nonstick spray to help prevent sticking. It works great!

Melt the butter and set aside.

In a medium sized bowl whisk together the brown sugar, eggs, vanilla extract and mashed banana. Add the melted butter to the brown sugar mixture and stir to combine.

In another large bowl combine the flour, baking powder, baking soda, cinnamon, and salt. Gently fold in the berries, making sure they are coated with flour. This helps to prevent the berries from sinking during baking. Add the wet ingredients to the dry ingredients and stir only until the ingredients are just combined. Do not over mix the batter.

Divide the batter evenly among the 12 muffin cups, using two spoons or an ice cream scoop. Place in the oven and bake until a tester inserted in the center of a muffin comes out clean, 20 to 25 minutes. Transfer to a wire rack to cool.

Makes 12 regular sized muffins.

This recipe was featured on:
It's a Keeper

This recipe is linked to It's a Keeper Thursday, Prairie Story, Tidy Mom, Potluck Sunday, and Fat Camp Friday

Saturday, April 2, 2011

Gluten Free Meatloaf

If you follow me on facebook, you know that last week I needed to make a gluten free dinner for another family. I of course am not gluten free, so I really had to think when it came to what to fix, without having to buy a lot of ingredients I'll only use once. This meal also needed to be dairy free, so a gluten free pasta dish was out as well. I came up with meatloaf. After looking at many recipes, I ended up using this one below. It does have an egg in it, which was fine with my friend. But, you could easily make this totally dairy free if you needed to with an egg substitute. I got an email from my friend this week raving about the meatloaf. (I of course couldn't try it out since I was taking to to someone else.) She said it was so flavorful and she couldn't believe it was made with ground turkey. So, her good review meant it could go on the blog. Even if you're not gluten free, this recipe includes a lot of veggies and no bread, so it has got to be healthier. The theory is that the finely chopped mushrooms serve as the bread crumbs in the recipe. I guess the theory was proven right in this case! I served this with oven roasted green beans and oven roasted red potatoes with peanut butter cookies and strawberries for dessert.


Gluten Free Meatloaf
from The Simple Gluten Free

Ingredients:
1 lb lean ground beef or turkey (I used ground turkey.)
1 teaspoon of salt
1 teaspoon dried thyme (or to taste)
freshly ground cracked pepper, to taste
1 egg
2 cups of mushrooms, finely chopped (I used my food processor to make them really finely chopped.)
1 teaspoon oregano
½ bell pepper, any color (I used green.)
2 cups onion, chopped
2 cloves of garlic
Ketchup or barbecue sauce to taste

Directions:
Preheat oven to 375 F. Heat saucepan, cook onions for roughly 10 minutes or until they are starting to brown, then add mushrooms and bell pepper. Make sure there is no additional liquid in the pan—this will have more of a boiling effect on the mushrooms, which is not ideal. Once cooked, combine with remaining ingredients in a larger bowl, finally form a loaf shape in a cooking pan or place in a loaf pan.

Cook for 45 minutes or until meat is fully cooked. If you prefer a sauce on your meatloaf, throughout the cooking process glaze with a light layer of ketchup, I did not do this.

This recipe is linked to It's a Keeper Thursday, prairie story, Tidy Mom, Potluck Sunday, and fat camp friday

Friday, April 1, 2011

April 2011 Menu Plan

Well, April is upon us. I know I say this every month, but I can barely believe it is April already! There is so much going on this month, with a couple of trips out of town including my sister's wedding and my ahem  30th birthday. *gasp* So, we have an abbreviated menu this month. We also have Easter Dinner and our annual Easter Egg Hunt where we have a potluck brunch. I have a lot of new recipes, including some from a cookbook I"m reviewing, so I hope they turn out good! Baby girl is also growing bigger and bigger and her due date is quickly approaching. We have a little over 10 weeks left, so I will try to make some freezer meals this month and next to get ready for her arrival in June. With my freezer and pantry clean out in March, I do have a little more room for some freezer meals. I'm looking forward to all of these new recipes I have listed, I just hope I can get to them all!

April 2011 Menu Plan
*all new recipes are in italics

Beef with Snow Peas and Brown Rice

baked ziti, garlic cheese bread, broccoli or salad

Homemade Pizza

Hawaiian Pineapple Chicken over brown rice

Calzones

Shrimp Po Boy Tacos

Potato Chip Chicken Tenders

PWs Ranch Style Chicken, restaurant style smashed potatoes, and broccoli

Fish Tacos with Mango Slaw

Zesty Italian Crescent Casserole and green beans

Baked Spaghetti, salad, french bread

Ranch Chicken, green beans, and homemade shake and bake potatoes

pinto beans and corn bread with ultimate grilled cheese sandwiches

Ravioli Lasagna, salad, french bread

cheesy salmon patties, green beans, baked mac and cheese

Easter Dinner- still working on this, but we will have ham and all the side dishes. Hoping my oven doesn't go out this year like it did last year! =)


Extra Treats:
Banana Pudding Pie
chocolate chip cookies
strawberry banana muffins
Coffee Cake or French Toast Casserole

LinkWithin

Related Posts with Thumbnails